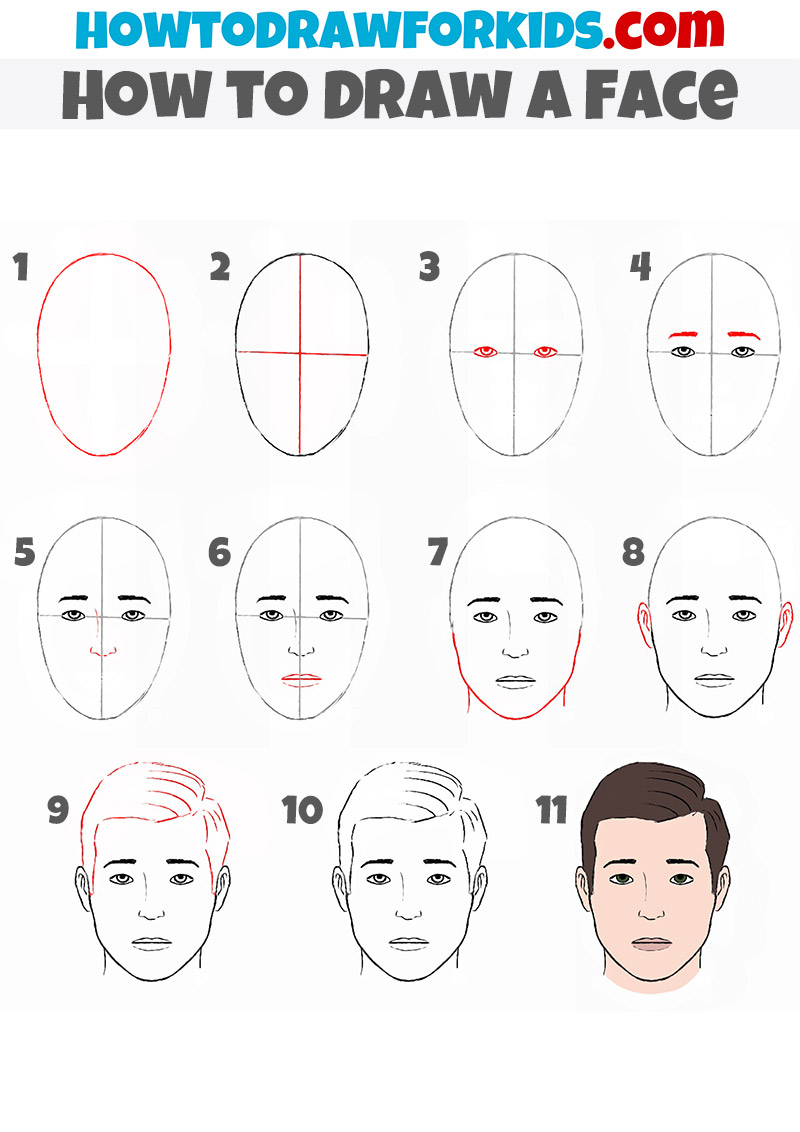
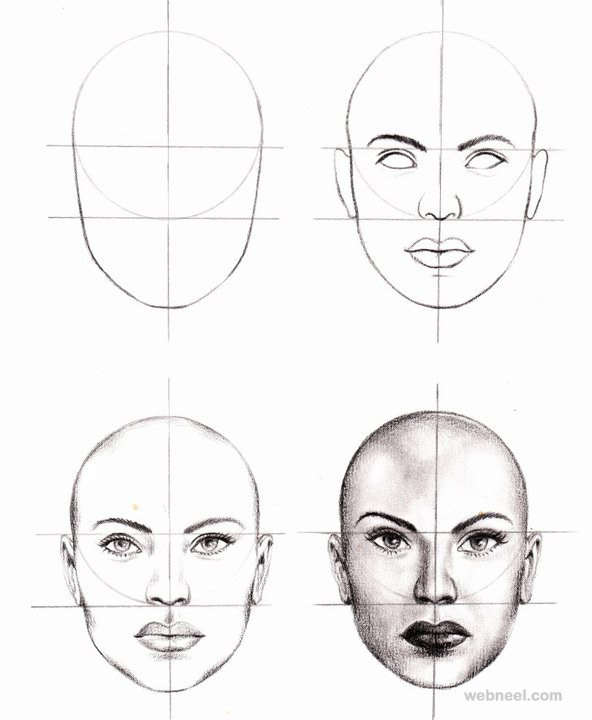
Step By Step Drawing A Face
Step By Step Drawing A Face - When you feel surprised, what happens to your face? Develop the lights and darks. We will look at how we can use our tools to create guidelines that direct our drawing process. Draw an oval that is roughly the same size as you want your final drawing to be. Then, develop the patterns of light and dark with a pencil. Draw guidelines on the face. Lightly sketch a vertical line down the center, then draw a horizontal line halfway between the top and bottom of the oval. This young woman is looking fabulous with her trendy hairstyle, hoop earrings, lipstick, and turtleneck sweater. Jun 9, 2021 • 4 min read. Begin by drawing a simple circle or oval shape. Web 61 easy face drawing ideas. Web how to draw a face in three ways. Develop the lights and darks. Firstly, we will look at the basic facial construction method using a few tools to guide us. Then, develop the patterns of light and dark with a pencil. These are the materials we are going to use: Begin your drawing by deciding how much of your paper you’d like the face to take up. There are 2 ways to do this step: Jun 9, 2021 • 4 min read. Stock photos from anton zabielskyi/shutterstock. These will be your guidelines for placement and symmetry. Web written by masterclass. Web to begin drawing a face, you’ll first need to layout some guidelines. Draw a vertical line down the center of the face and make sure both sides of the face are symmetrical. This line will give you the eye placement. Web to begin drawing a face, you’ll first need to layout some guidelines. When you feel surprised, what happens to your face? The more you practise this simple exercise, the more easily you will be able to complete and make corrections to head drawings in the future. In the middle, draw another horizontal line. Web how to draw a face. The more you practice this simple exercise, the more easily you will be able to complete and make corrections to head drawings in the future. Web 61 easy face drawing ideas. Begin by drawing a simple circle or oval shape. Web when you’re drawing a face, begin by sketching in a basic oval shape. To help you make sure that. These will be your guidelines for placement and symmetry. Draw an oval slightly wider at the top than bottom. When you feel surprised, what happens to your face? You'll want to familiarize yourself with three viewpoints: Draw a vertical line down the center of the face and make sure both sides of the face are symmetrical. Begin your drawing by deciding how much of your paper you’d like the face to take up. Draw an oval that is roughly the same size as you want your final drawing to be. Web when you’re drawing a face, begin by sketching in a basic oval shape. Stock photos from anton zabielskyi/shutterstock. Begin by drawing a simple circle or. Web see an easy way to draw a face in ten simple steps. Web how to draw a face in three ways. Web learn how to draw a realistic female face in 32 detailed steps. Begin by drawing a simple circle or oval shape. Develop the lights and darks. Draw better portraits through the study of anatomy my new full portrait anatomy course is finally here!. Next, draw a line down the center of the face vertically, and another one horizontally halfway between the top and bottom. Lightly sketch a vertical line down the center, then draw a horizontal line halfway between the top and bottom of the oval.. Using a ruler, draw a horizontal line at the top and bottom of your paper with two vertical lines around an inch from either side. In the middle, draw another horizontal line. These are the materials we are going to use: Draw a vertical line down the center of the face and make sure both sides of the face are. First and foremost, when you are sure of your accuracy, carefully remove the grid lines with a kneaded eraser. Web how to draw a face step by step. Firstly, we will look at the basic facial construction method using a few tools to guide us. Web 61 easy face drawing ideas. These are the materials we are going to use: Follow our free tutorial for beginners and become a better drawer! Lightly sketch a vertical line down the center, then draw a horizontal line halfway between the top and bottom of the oval. These will be your guidelines for placement and symmetry. Then, develop the patterns of light and dark with a pencil. Divide the remaining space below in half and make a line there. Begin by drawing a simple circle or oval shape. The more you practice this simple exercise, the more easily you will be able to complete and make corrections to head drawings in the future. And these are all the steps we’ll walk you through: There are 2 ways to do this step: Draw better portraits through the study of anatomy my new full portrait anatomy course is finally here!. We will look at how we can use our tools to create guidelines that direct our drawing process.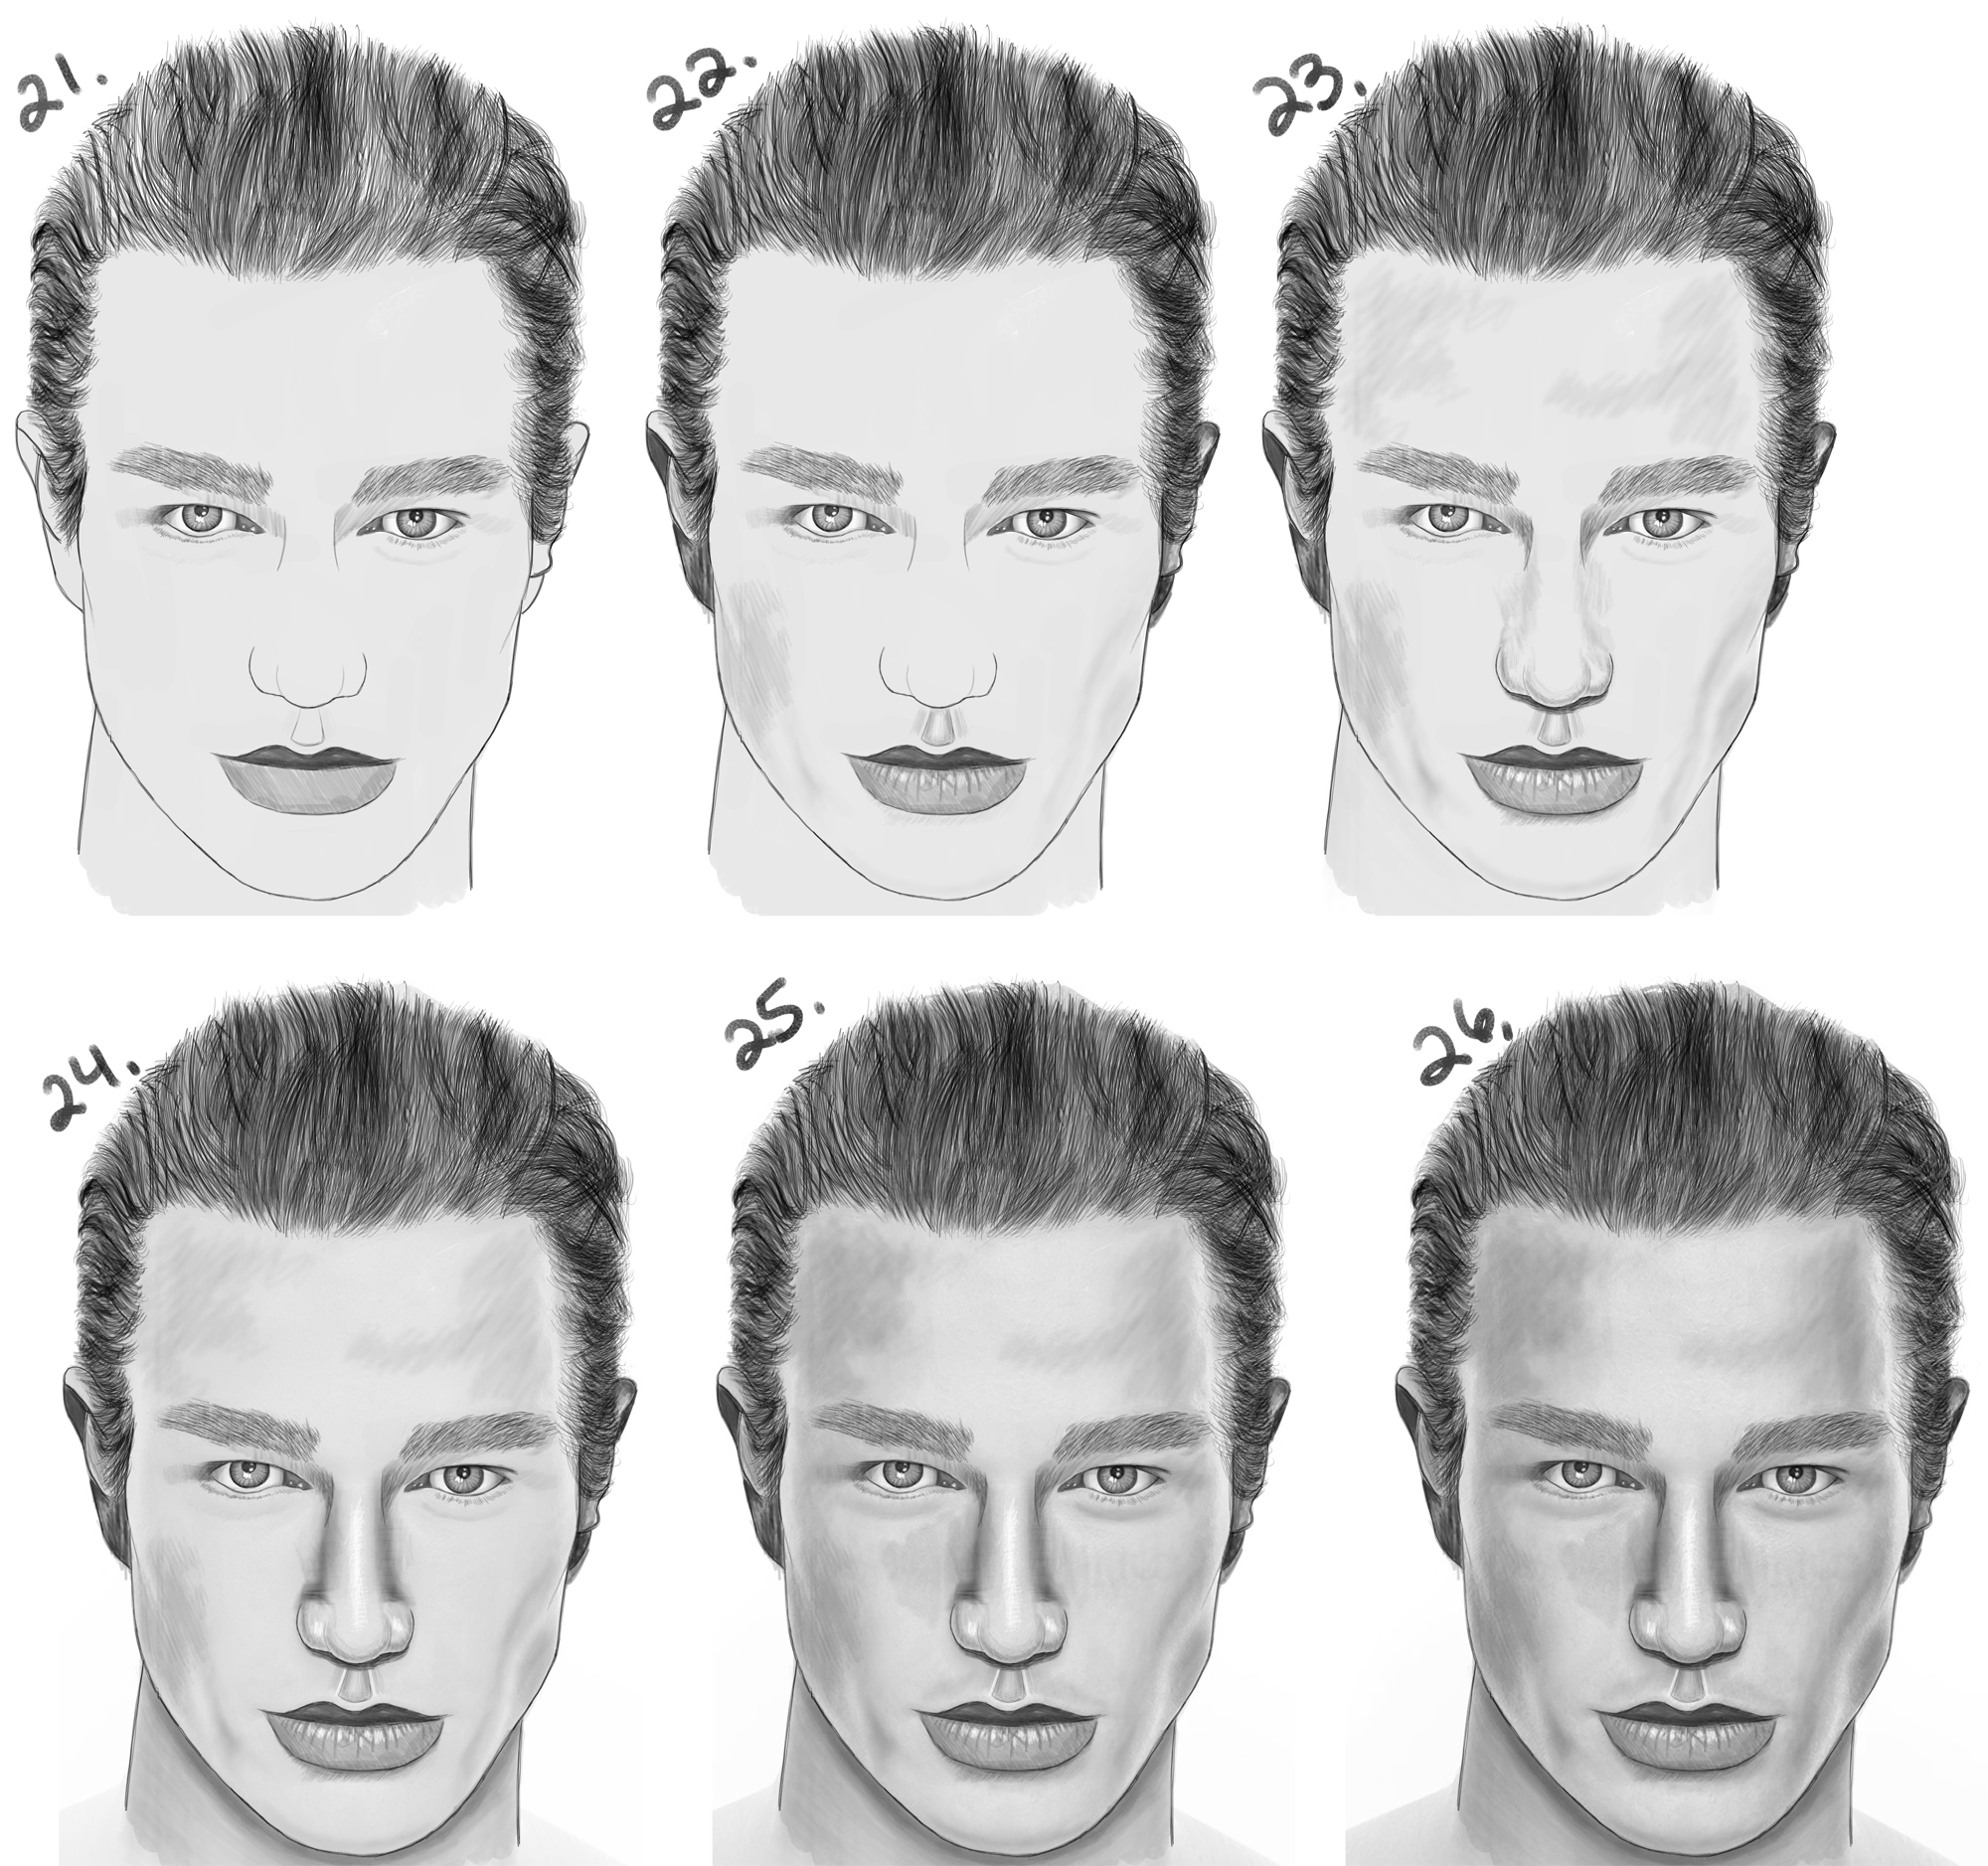
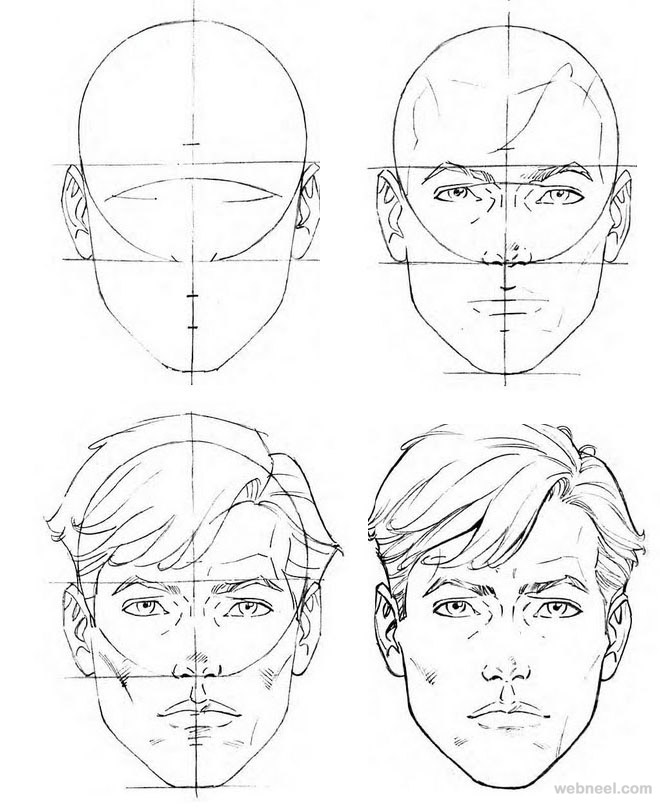
How to Draw a Man's Face from the Front View (Male) Easy Step by Step
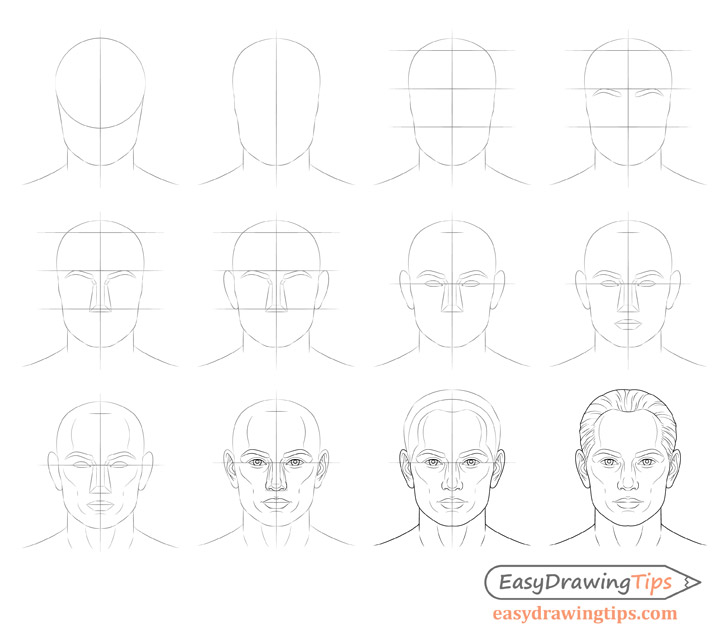
How to Draw a Male Face Step by Step Tutorial EasyDrawingTips
How to Draw a Face 25 Step by Step Drawings and Video Tutorials
How to Draw a Man's Face from the Front View (Male) Easy Step by Step
How to Draw a Face for Beginners Very Easy Drawing Tutorial

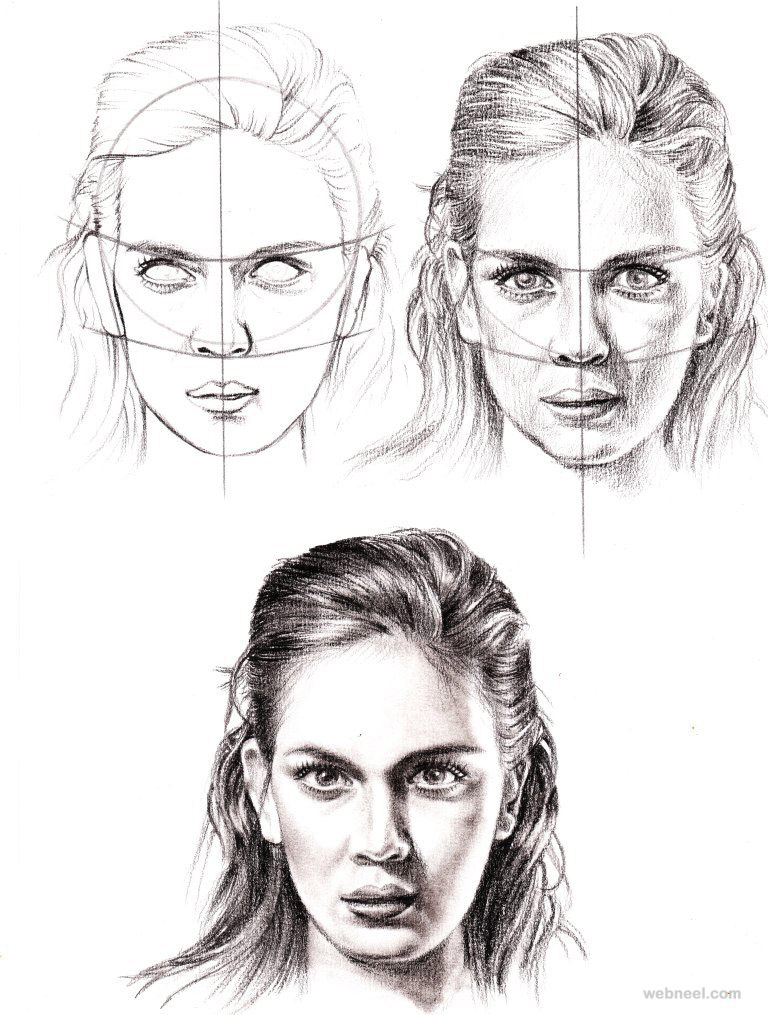
How to Draw a Realistic Cute Little Girl's Face/Head Step by Step
How to Draw a Face 25 Step by Step Drawings and Video Tutorials
How to Draw a Face 25 Step by Step Drawings and Video Tutorials
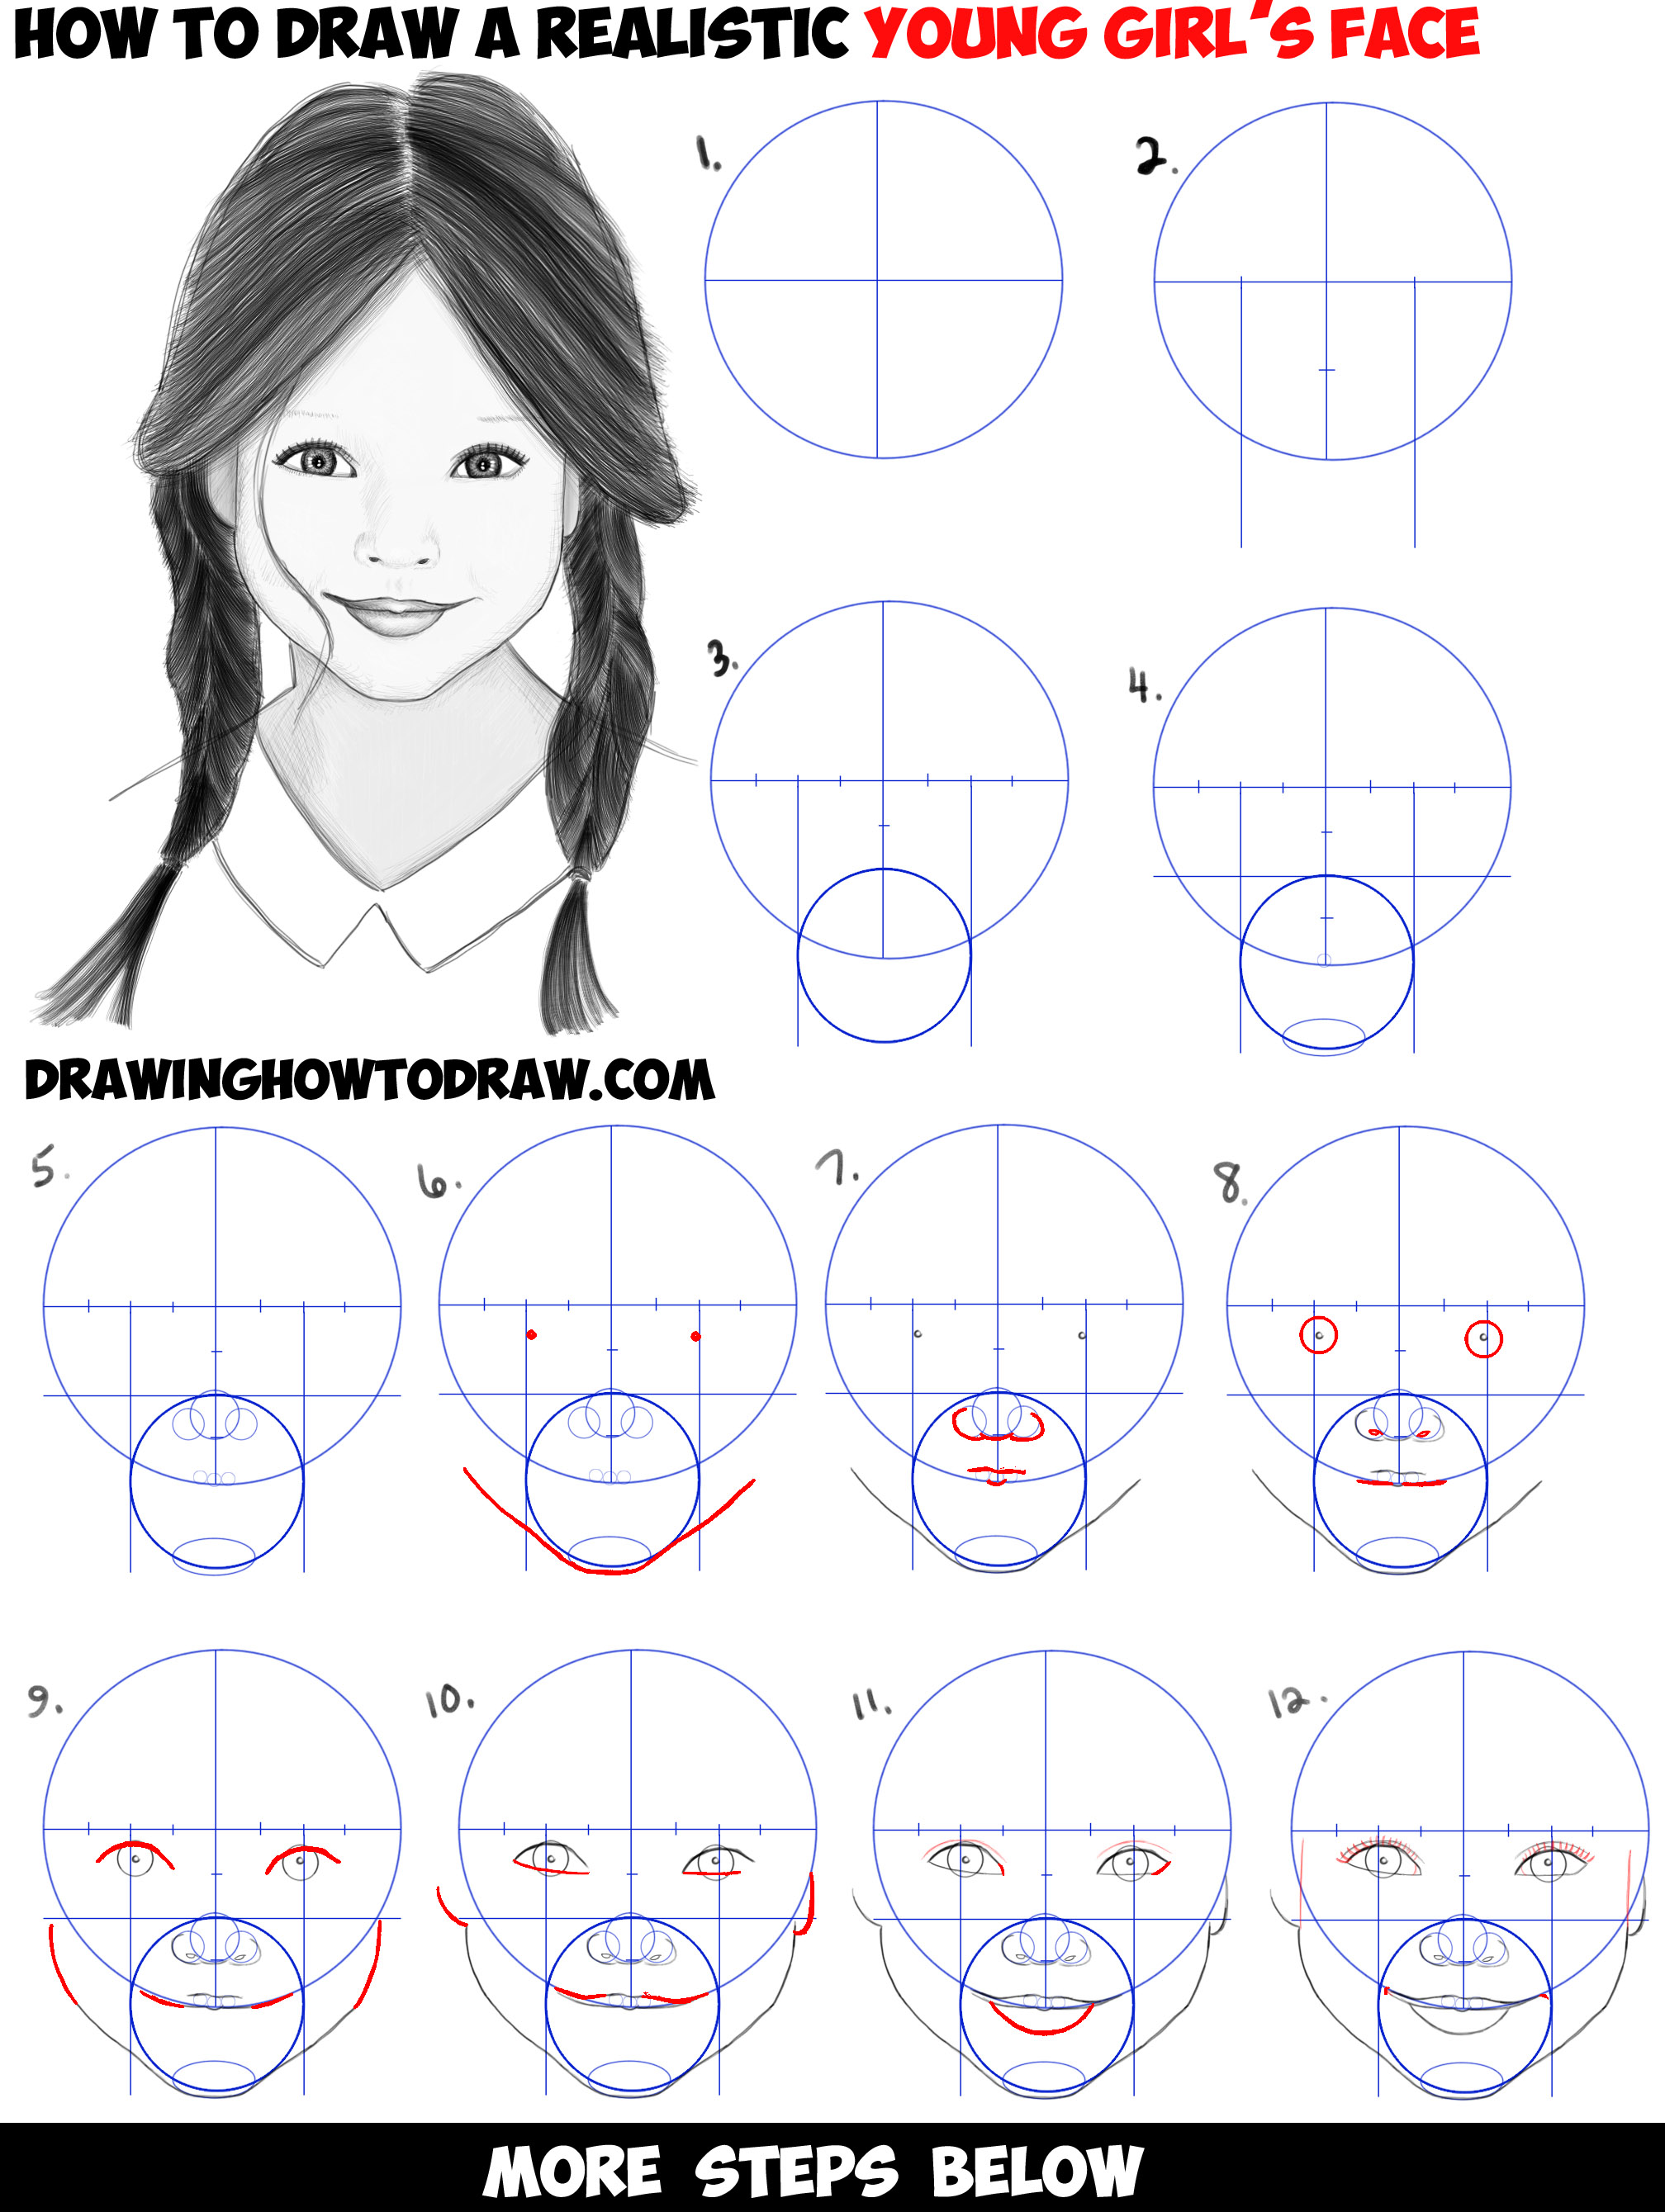
How to Draw a Realistic Cute Little Girl's Face/Head Step by Step

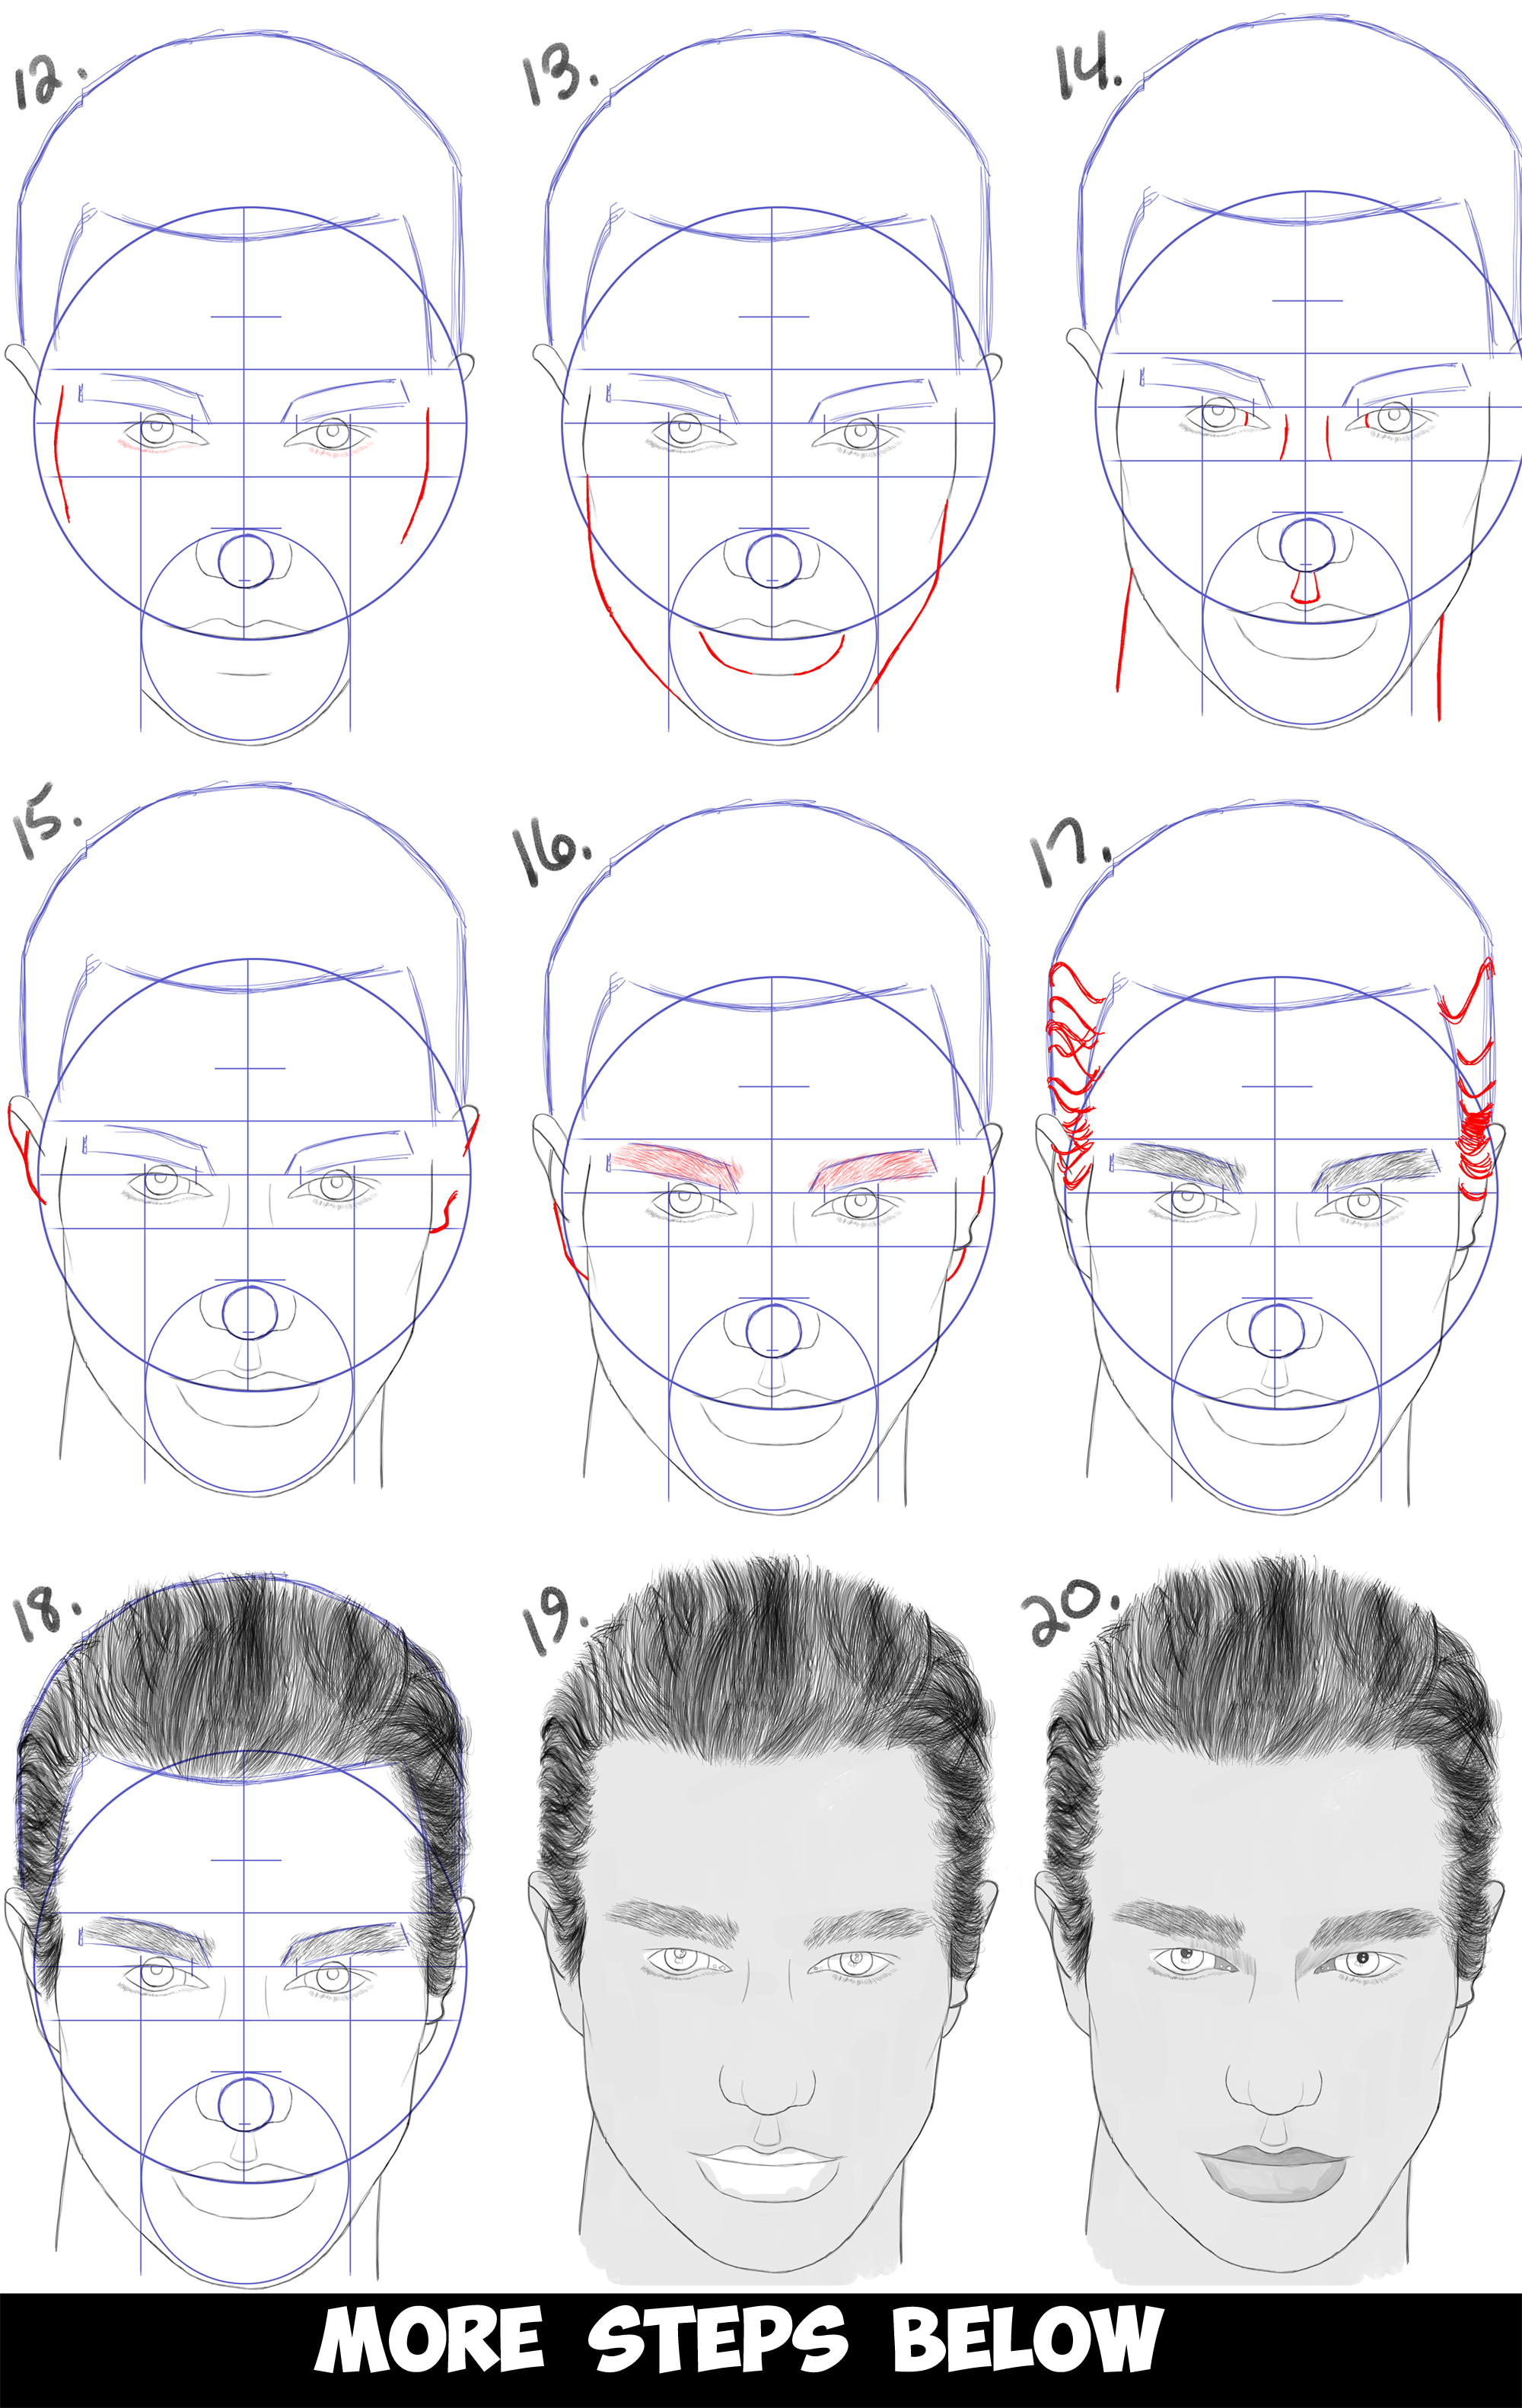
How to Draw a Man's Face from the Front View (Male) Easy Step by Step
You'll Want To Familiarize Yourself With Three Viewpoints:
To Help You Make Sure That Both Sides Of The Head Will Be Of Equal Width And That The Facial Features In Later Steps Will Be Evenly Spaced Start Your Drawing By First Making A.
Draw An Oval Slightly Wider At The Top Than Bottom.
If You Would Like To Join My Online Drawing Course For Beginners Please Click Here:
Related Post: